I’ve covered this in several other articles as a side effect of getting those higher level goals complete. But given a simple Google Search failed me… here is this in case someone else needs it.
When you just want: “Raspberry PI3 NodeJS GPIO Control” – this is how you get it done:
npm install --save rpi-gpio
Then the code. Note the key piece for the Raspberry PI 3 is this:
gpio.setMode(gpio.MODE_BCM);
Blink NodeJS & rpi-gpio style:
Finally the whole code. All this does is toggle pin 16. 🙂
var gpio = require('rpi-gpio');
gpio.setMode(gpio.MODE_BCM);

var lampPin = 16;
function pinBlink() {
 gpio.write(lampPin, false, (err) => {
   if (err) {
     console.log("Error in setting gpio pin.",err);
     return;
   }

   setTimeout(() => {
     gpio.write(lampPin, true, (err) => {
       if (err) {
         console.log("Error in setting gpio pin.",err);
         return;
       }
     });
   }, 1000);
 });
}

gpio.setup(lampPin, gpio.DIR_OUT, () => {
 setInterval(pinBlink, 2000);
});
Listening to a button state change (a.k.a. Button press)
Sometimes you just want to process a button press. This is the code for that. Note that you can change the transition you listen to with the last param:
var switchPin = 21;
gpio.setup(switchPin, gpio.DIR_IN, gpio.EDGE_FALLING);
gpio.on('change', function(channel, value) {
  //do something on the change.
});
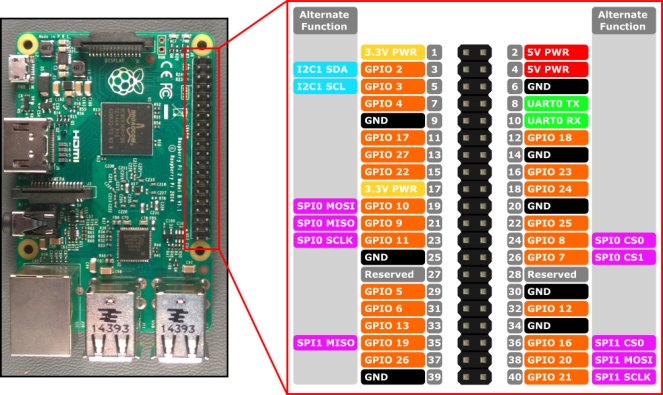
Handy Pin Ref
Make sure you run as ROOT!
The GPIOs are worked with through the filesystem. Your code can only reach those files if you run as root.
Channels/Pins you can’t use:
- 1
- 2
- 4
- 6
- 9
- 14
- 17
- 20
- 25
- 27
- 28
- 30
- 34
- 39
The above list is all reserved for something else… or ground, or 5V, or 3.3V… you get it. 🙂
Phew.
Now, hopefully, my future internet search friends will have a chance. 😉

3 thoughts on “Raspberry PI3 NodeJS GPIO Control: rpi-gpio”