
Sometimes you need your little linux box to be available for login even while it lives on foreign networks.
Why…?
Say you are helping a remote friend play with a pi. Or you just want to share a TMUX between your kids and their friends. Another use-case – as a professional, deploying a bit of software, or hardware, and you’d like to get metrics from it, or check in on its performance, or even – you’d like to install something after the box is in place.
Normally this is impossible because incoming connections are blocked by firewalls, or its simply a pain to keep track of a dynamically changing IP.
What…?
To get around this is a wonderful tool called SSH Tunneling. The way this works – you setup your PI to wait for a network connection. Once it gets it, the raspberry PI will ssh into a known host on the internet – lets call this host ec2-jump. Ec2-jump is a host for which the raspberry pi already has ssh keys on disk.
When the ssh session is established, the raspberry PI remote-forwards its own SSH port from ec2-jump at a pre-defined port… say 2800.
Now, I want to get to that little PI running in a foreign network. I ssh into it by using something called a Remote Proxy. The Remote Proxy is this ec2-jump host. Its there just to host the port from the PI for exactly this type of connection. SSH has built-in functionality to simply use that port as though I were ssh’ing directly onto the host.
This is all a little confusing I’m sure. So lets just do it, and you can think about how this magic works elsewhere.
How…?

To break down the whirlwind I explained above. Take a look at the diagram.
When the raspberry pi gets a network connection, it SSH’s into the “Cloud Computer” this is represented by the “1” in the diagram. Note that it is able to communicate through the firewall at 2 without doing anything weird because this is an outgoing connection. Just like the connections you make to websites.
Next, after the ssh connection is established at “3” in the diagram. The SSH client on the Raspberry PI, requests a “RemoteForward” of a port, say 2500, to the Raspberry Pi’s port 22. 22 is the native port for SSH. This means, if software on that “Cloud Machine” attempts to connect to port 2500 locally on that cloud machine, redirect all of that unadulterated traffic through to port 22 on the PI… all inside the ssh connection the pi just made.
This RemoteForward directive is incredibly cool. It makes connections to machines elsewhere on the planet look as though their software is running on the host machine.
Now… we jump over to you at “4” in the diagram. You are the hapless admin that would like to get access to the PI. Sadly, you are very far away from your poor PI. Relegated to an entirely different WiFi access point. Lucky for you, you’re smart, and you setup the PI to do this forwarding magic when it boots. All you have to do, is ssh to the Cloud Computer and tell your ssh client to Proxy through to the PI at port 2500 (represented at step 5).
Proxy means, to ssh into a 3rd computer through the current ssh connection. To do this, you just need to tell it *where* to send your traffic to, in this case, localhost:2500. SSH’s brilliant software will now route you through to the PI using both your ssh to the Cloud Computer and the ssh from the Raspberry PI!!!
Voila… you’re in!
Sounds like a lot to do though… right? Nope! Turns out, its stupid simple to make all this happen automatically.
Let’s do this…
To make this easy, you need to work with a bash-like interface. I don’t have a Windows computer, but they make it a little tougher to do this. Macs, Raspberry PIs and other computers with “Linux-y” interfaces work the same way. So these instructions are for those OS’s.
First – make sure you have SSH installed. If its a MAC – you’re good to go. If its a Raspberry PI – you might need to install or turn ssh on. Follow this article:
https://www.raspberrypi.org/documentation/remote-access/ssh/
Once you have that. You’ll need to configure it to pass credentials automatically. First, generate your ssh key:
ssh-keygen
Then, take all the defaults. This will generate a new key for you. Like this (don’t worry crypto cats – I destroyed this key):

Armed with your new ssh-key. Setup your ssh-config…
The SSH config allows you to name machines and declare how they should be negotiated.
The ssh config file needs to be created here:
/home/<username>/.ssh/config
Where the username is your account name. On a Raspberry PI its: pi
Here is an example snippet from my config file:

In this config entry it states, the host should be accessible by the name “ec2-jump”, the ssh key used to negotiate is located at “~/.ssh/id_rsa”, the user SSH should try to login through is “ec2-user”, and the hostname that allows it to be found on the internet is, “ec2-35-164-124…”.
Now when I type:
ssh ec2-jump
All of those things will happen under the covers. Before that works though, a little more setup is needed. Namely, your ssh key needs to be considered “authorized”…. so login to your ec2 host – thats the guy you are going to ssh-through. In my config its at: “ec2-35-164-…compute.amazonaws.com”
By the way… if you need help setting up an EC2 host.
Be sure to check out…
Creating an Amazon AWS EC2 Instance… for all your cloud compute needs.
Setting a key as “Authorized”
To allow for login-less ssh, you need to add your key to the “authorized” list. To do so, cat your public key:
cat ~/.ssh/id_rsa.pub
Copy the output, and open up the file:
vim ~/.ssh/authorized_keys
Paste in the contents. It should now contain something that looks like this (but with your email):
ssh-rsa AAAAB3N....<a whole lotta junk>..IH8Vl matt@myhost.com
Done! Now when you login, all you have to do is:
ssh ec2-jump
Boom! You’re in!
Now we can use this host as our jump host. We wanted to login to another host that logged into the jump. On that 3rd host, also place your public key within authorized_keys:
vim ~/.ssh/authorized_keys
Now… setup the RemoteForward
When the host PI connects. It must also request that a port from the host in the cloud, is forwarded to its local port 22. That way when the laptop connects, it can use the localhost host name and assigned port, to connect to the remote host.
So, on the config for the raspberry pi:
Host ec2-jump
  IdentityFile ~/.ssh/id_rsa
  Hostname ec2-35.blah.blah.blah
  User ec2-user
  RemoteForward 2500 localhost:22
So now, whenever the pi connects to ec2-jump, it will open port 2500 on that host, and redirect those connections to the PI’s port 22.
The last bit of magic…
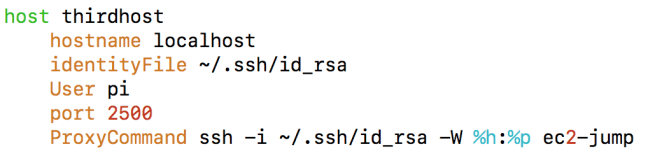
Add the above to your ~/.ssh/config file. This tells your ssh client, to ProxyCommand through the ec2-jump to the final thirdhost machine. To use this config just type:
ssh thirdhost
You should be in! Note, the “localhost”, that’s required to tell the ssh to get onto the ec2-jump, then, while there, connect to the localhost port 2500 which is mapped to the PI’s ssh server port.
Some debugging tips…
SSH command line has the -vvv parameter. Use it to see what step in the negotiation fails.
Also, when debugging where things go wrong. Make sure you can successfully ssh into the intermediate host. (In this case, that is EC2-Jump.
For Windows people…
SSH was recently released for windows. Which is great but it turns out it doesn’t yet work with the Proxy feature. To get around that. Use Putty to establish the connection with the jump host. In the putty “tunnels” directory, put in a localforward of a port(say 4040), to the localhost port of the thirdhost. In this case it would be 2500.
Then use ssh on the terminal like this:
ssh -i ~/.ssh/id_rsa -p 4040 pi@localhost
Sorry… that’s only a bit of a clue, but things will be getting better for Windows users soon.
Good luck!

Thanks for pointing out the edits. 🙂
LikeLike