
(The Penguin is the Linux Mascot)
Some background…
Linux was built in a time in which a computer must be shared. They were far too expensive to have one per user. Additionally, each of those computer users needed a mechanism in which they don’t have to worry about what others on the machine were up to, even while sharing the CPU, disk, network and programs.
So, a huge amount of effort went into making sure a “user” could have a clean account, with their own settings, history and workspace.
While the cost-per-user has certainly changed, its still handy to share a computer among multiple users. Raspbian (a flavor of Linux) is really, really good at handling lots of users.
The first user…
When you setup Raspbian for the first time, its likely you created your first user “pi” without even knowing it. This user starts with the default password “raspberry“.
Oh, give me a home…
When a user is created, it will typically also need a “home“. Home is a directory where you are dropped when you login. Its also where programs you run will want to store configurations and history that are particular to you. Your home is is located at:
/home/pi
Which you can see if you type:
pwd
So that program’s can find your home, there is a special environment variable called $HOME which you can see by typing:
echo $HOME
That should show you the path to your home…. but enough blather. Lets create some users.
Adding a user…
So enough background, lets get started.
useradd – Adding a user
The command for creating users is…. “useradd” nice, right? To run it, you have to be a super user, and by default the PI user is. So simply run:
sudo useradd username
Where username is replaced with the name of the account you’d like to create. Here is the command to create a user with my name:
sudo useradd mamacker
passwd – Setting their password
Now, this created the user, but it didn’t set their password. To do that, use the command “passwd“, like this:
sudo passwd mamacker
It will then ask you for a password for that user, enter it twice. Next we need to make the sure the new user has a home.
mkhomedir_helper – Create their home directory
Making a user’s home is a fairly easy task, but its a little bit of a pain due to the number of steps involved. The folks in linux dev recognized this and created a simple tool called “mkhomedir_helper“. This puppy does all the heavy lifting for you. Run it like this:
sudo mkhomedir_helper mamacker
Phew… that’s it. Your new shiny user is all ready for use.
Try it out…
Login…
To make sure the new user is available. You should try logging in as that user like this.
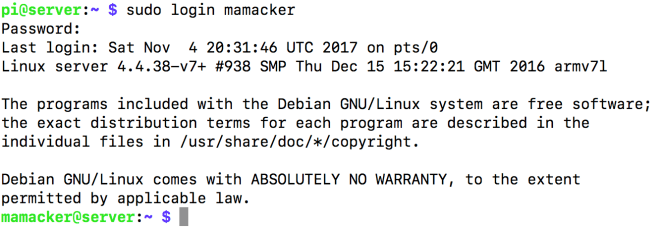
sudo login mamacker
Where mamacker is the username of the account you created. This will prompt you for the password. If all goes well, you’ll be dropped into your new user’s home directory. Fresh and clean and ready for action.
To confirm – use the command we learned earlier:
echo $HOME
That should show you the new path.
A new password…
Lets say the user NOW wants to enter in their own secret password. They can change their password at anytime with the same passwd command. This time without sudo:
passwd
That will prompt for the current password, and the updated password of their choosing.
Super users…
Finally – if you want to make an account a super user, so they can run sudo commands, you need to include this new user in the exclusive list. There’s a command for that too! Before you use this command, you’ll have to logout, and get back to an account that has sudo already. The pi user is a sudoer already. To logout of an account:
logout
This should take you out of the account you created and you’ll be back at pi. Once there, try this command to add your new account the register of supers:
sudo adduser mamacker sudo
But, again, change mamacker to the user name you created.
Done!
Tell your new user they are free to login. Give them the username you created them, and the password they’ll start with – and they can frolic and play, oblivious of and harmless to the others on the system.
Have fun!
