
One of the things a good magic wand should do is respond to magic incantations.
This guide will take you through getting Google Cloud Speech APIs functioning on your Raspberry PI 3 so that you can trigger speech recognition through a button press on your magic wand.
The Microphone…
Before you can get speech… you have to get sound into your raspberry. The current PI hardware doesn’t support sound capture – so you’ll need to get a USB sound card. Don’t worry – these have become super cheap these days.
Check out these:

On Amazon – that one is $5. On Ebay you can get it far cheaper, especially in bulk. Then you need a good microphone for the task. I tried some cheap headphone-based microphones, and wasn’t pleased. So I splurged a little and got this one:

There are probably many available, for far cheaper, that would work sufficiently for a magic wand. Google’s Speech recognition engine is incredibly robust.
Once you have your USB card, insert it into any of the USB ports. Next, plug your microphone into the side with the image of the microphone.
That’s it for the hardware… time to grab some software.
Install NodeJS and GCloud…
With package manager…
First, install NodeJS. At the time of this writing, I prefer NodeJS 6. The best way to install it is through the package manager. This site contains all the details:
https://nodejs.org/en/download/package-manager/
The important bit is this (Note: this can take a little while):
curl -sL https://deb.nodesource.com/setup_6.x | sudo -E bash -
sudo apt-get install -y nodejs
When package manager fails!
Sometimes the folks supporting the builds have a glitch, and the ArmV6 version of the build doesn’t get published…. so it will complain with this message:
“## You appear to be running on ARMv6 hardware. Unfortunately this is not currently supported by the NodeSource Linux distributions. Please use the ‘linux-armv6l’ binary tarballs available directly from nodejs.org for Node.js v4 and later.”
Which is bunk, but here is the work around during these dark times:
wget https://nodejs.org/dist/v6.10.0/node-v6.10.0-linux-armv6l.tar.xz
tar xvf node-v6.10.0-linux-armv6l.tar.xz
cd node-v6.10.0-linux-armv6l
sudo cp -R bin/* /usr/bin/
sudo cp -R lib/* /usr/lib/
sudo apt-get update && sudo apt-get upgrade
sudo apt-get install build-essential
Once NodeJs is installed…
Next, create the directory you’d like to use to construct your NodeJS software:
mkdir speech
cd speech
npm init
“npm init” will ask you several questions. Feel free to take the default, you can always modify the package.json it generates later.
Next, install GCloud Speech (takes a while because it has to build parts from scratch):
npm install -s @google-cloud/speech
npm install -s google-cloud
The install rpi-gpio:
npm install -s rpi-gpio
Time to get credentialed!
To use the Google Cloud services you have to have credentials for authentication. This is how Google knows who to charge for large volumes of service calls. Don’t worry though – your magic wand wont do more than the free-tier.
First – you’ll need to make sure you have a google account. Gmail is perfect. If you don’t yet have that – create one! They are free, and the sign-up process is quick.
Once you’ve logged into your account – head over to Google Cloud Console while on your PI:
https://console.developers.google.com
After logging in, you should see:

Time to create a project.
In the upper left there is a project drop down:

Click “Create project”

Which will cause the “New Project” dialog to appear:

Feel free to leave the default name. Note the part under the input box… in this case “glass-tide-155823”. That is the project ID, and it will be important later when we use the credentials in our code. Now, Select the “Yes” for agreeing to the terms… assuming you do. Once you agree the “CREATE” button becomes available for clicking:

Ok, now, back at the upper left, your project is available for clicking on:

Time to enable speech:
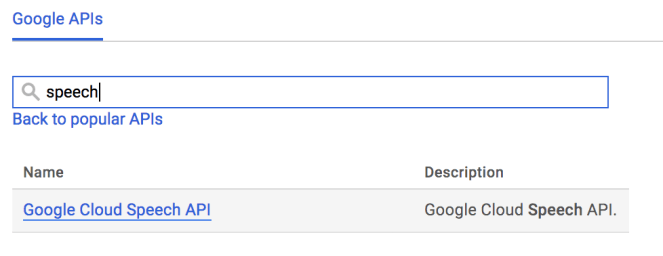
Click on the project you just created. That will drop you back on the page containing all of the available APIs. Type in “speech” in the search box. Which will result in only one option, “Google Cloud Speech API”:
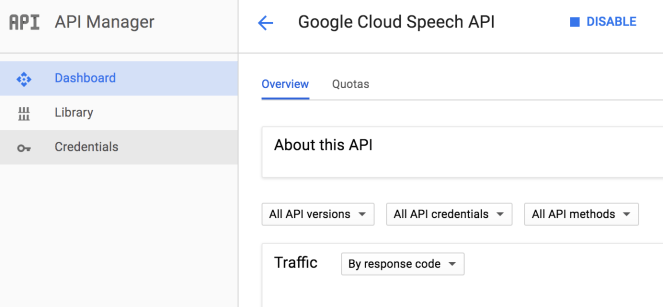
Click on that option, which will drop you on the page with the option to enable it. Look for the “ENABLE” button on the upper right, and click it.

Now that its enabled the button will have the option to “disable”. It will also show you charts for the number of queries you’ve executed against it.

Time for the credential file!
On the left hand side you’ll see the option for “Credentials”. Click on that.
Which will drop you here:
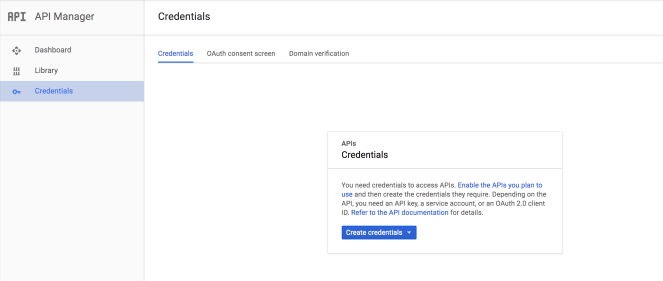
Use the drop down titled “Create Credentials”:

Select “Service account key”. Which will bring up a dialog asking about which account to use. Just select the default.

Make sure the JSON radio button is selected. Then click “Create”. This will cause a JSON file to download to your computer:


Keep that file! If you followed all of these steps on your Raspberry PI – this file exists in your “Downloads” directory.
You now have credentials!!! Time to use them.
Write some software….
Phew! You have permission to call Google’s Speech API now. Time to do it!
Back in your speech directory… you know, the one you created above for your project (look at the NodeJS section). Run your editor of choice to create a new file called: index.js
vim index.js
In this, add this code:
var speech = require('@google-cloud/speech')();
var fs = require('fs');
var gpio = require("rpi-gpio");
gpio.setMode(gpio.MODE_BCM);

const spawn = require('child_process').spawn;
process.env.GOOGLE_APPLICATION_CREDENTIALS='/home/pi/speech/keyfile.json';

speech = require('@google-cloud/speech')({
  projectId: 'glass-tide-155823',
  keyFilename: '/home/pi/speech/keyfile.json'
});

var request = {
  config: {
    encoding: 'LINEAR16',
    sampleRate: 16000
  },
  singleUtterance: false,
  interimResults: true
};

var busy = false;
function utterToMe() {
  if (busy == true) {
    return;
  }

  busy = true;
  const arecord = spawn('arecord', ['-f','S16_LE','-r','16000', '-D','plughw:CARD=Device,DEV=0'], {}, () => { console.log("Started"); });

  console.log("Kicked off process.");
  arecord.stdout.pipe(speech.createRecognizeStream(request))
    .on('error', console.error)
    .on('data', function(data) {
      if (data.results) {
        console.log(data.results);
      }
    });

  setTimeout(() => {
    console.log("Done with current recognition.");
    arecord.kill();
    busy = false;
  }, 3000);
}

var switchPin = 21;
gpio.setup(switchPin, gpio.DIR_IN, gpio.EDGE_RISING, () => {
  gpio.on('change', function(channel, value) {
    console.log("Pin " + channel + " is " + value);
    utterToMe();
  });
});
Note the bolded part in that code. The part that says:
glass-tide-155823
That is the string that is specific to your project. You can find that value back on your google cloud console here (its different for everyone):
Also note that the directory “speech” is hard-coded. So if you decided on a new directory – be sure to update that value.
Finally – note this entry in the code:
process.env.GOOGLE_APPLICATION_CREDENTIALS='/home/pi/speech/keyfile.json';

speech = require('@google-cloud/speech')({
  projectId: 'glass-tide-155823',
  keyFilename: '/home/pi/speech/keyfile.json'
});
See the path in there:
/home/pi/speech/keyfile.json
That is where you need to copy your credential file:
cp /home/pi/Downloads/My\ Project**************.json /home/pi/speech/keyfile.json
Where the ************* bit is replaced by the filename Google downloaded onto your pi.
This is assuming you downloaded the credential file while on your PI. If you didn’t, you’ll have to get the file to this location somehow. (Try SCP in a google search. That’s a handy tool to know.)
Ready to fire!!!
Sooooo close! This code is designed to use a button hooked up to pin 21 on the raspberry pi. When that pin is pulled HIGH, meaning the pin is allowed to touch the 3.3V pin, then it will call “utterToMe()” which will kick off the speech recognition!
To run the code – you must run as root:
sudo node index.js
When it first starts you see a bunch of these:
(node:3021) UnhandledPromiseRejectionWarning: Unhandled promise rejection (rejection id: 1): Error: Could not load the default credentials. Browse to https://developers.google.com/accounts/docs/application-default-credentials for more information.
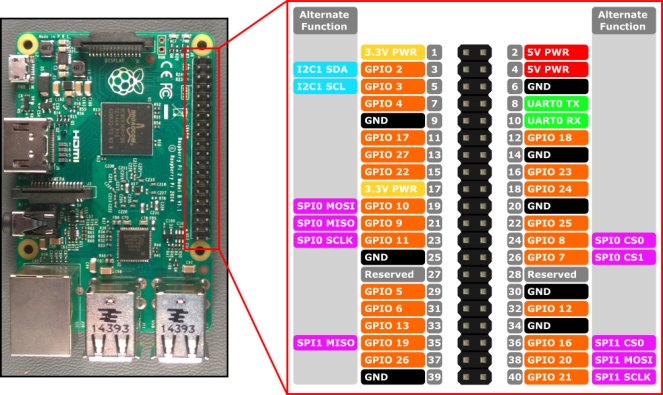
Ignore them. Now, take a wire, or a button, and very carefully touch pin “GPIO 21” with the “3.3V PWR” line. (Note: don’t use the pin labelled “GPIO 9 – 21” – that aint it.)
Here is a pin reference image:
Immediately you should see:
Pin 21 is true
Kicked off process.
Pin 21 is true
Pin 21 is false
Done with current recognition.
If you did, AWESOME! Now, this time, again carefully touch the pin again, but this time say: “What time is it in San Francisco”
If everything is working – you should get some variation of:
Pin 21 is true
Kicked off process.
Pin 21 is true
Pin 21 is false
Pin 21 is true
Pin 21 is false
Pin 21 is false
Pin 21 is false
Pin 21 is false
Pin 21 is true
Pin 21 is false
Pin 21 is true
Pin 21 is true
Pin 21 is false
what
what time
what time is
what time is it
what time is it in
what time is it in
what time is it in San
what time is it in San Francisco
what time is it in Sanford
what time is it in San Fran
what time is it in San Fran
what time is it in San Francisco
what time is it in San Francisco
what time is it in San Francisco
what time is it in San Francisco
Done with current recognition.
BOOM! You now have the power!!!!

Wielding Speech Power for good…
Time to wield that power for good. Check out the code again, and look at this section:
arecord.stdout.pipe(speech.createRecognizeStream(request))
 .on('error', console.error)
 .on('data', function(data) {
   if (data.results) {
     console.log(data.results);
   }
 });
The code: data.results will contain the results of Google’s speech recognition APIs. Which means you can use that to decide what action you should take on behalf of the utterance.
To take an action based on a command add code like this:
console.log(data.results)
if ((data.results + "").match(/(lumos|loomis)/)) {
  // turn on lights!
}
For tips and tricks on how to control the power in your house check out one of these articles:
Raspberry PI Controlling Power through GPIO (no wifi needed)
Raspberry PI for controlling TP-Link POWER
Raspberry PI for Controlling Wemo Power
Need more help? Add a comment, and I’ll try to improve the article with any assistance!

3 thoughts on “The complete guide to enabling speech recognition on an RPI3… in NodeJS”